First of all you need to install simplescreenrecorder in Debian.
So the youtube side is quite explained in the official documentation. There is an explanation on how to create a live event. Then check the live encoder settings, bit rates and resolutions. I personally choose 480p because my upload bandwith is not so good.
The trick here is to choose «Other encoders» under the Select your encoder question.
This will show some special data that you need to feed into your encoder.
What you see is similar to:

Recording name: username-1234.abcd-efgh-1ab2c-335ds (This will change for each new live event)
Main server URL: rtmp://a.rtmp.youtube.com/live2
Secondary server URL: rtmp://b.rtmp.youtube.com/live2?backup=1 (We will not use it)
.
Then you go to Live Control Room to check that the stream status is «Without data».

Now, it’s time to run simplescreenrecorder.
- Click on Continue on the welcome screen

- Profile
-

- I just created a new one
- Video input
- Record the entire screen (I record my second screen which I previously setup as 1024×768 so that everything is read ok. Your settings may vary).
- Photograms rate: 30 (I just used the default one)
- Record cursor: Yes
- Scale video: I have it unchecked so that it does not use so much cpu
- Audio Input
- Record audio: PulseAudio. Internal Audio
- Finally we press on Continue button
- Profile
-
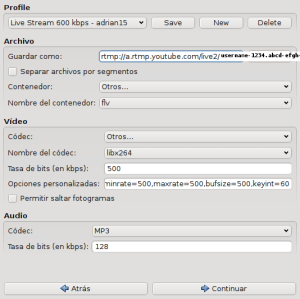
- Live Stream 1000 kbps which we will adapt for 500 kbps
- File
- Save as:
- This is the main server URL concatenated with the recording name thanks to /.
- This is what should be explained on Youtube site and it is not.
- So here there is what would be based on our example:
- rtmp://a.rtmp.youtube.com/live2/username-1234.abcd-efgh-1ab2c-335ds
- Container: Other
- Container name: flv
- Save as:
- Video
- Codec: Others
- Code name: libx264
- Bitrate (bps): 500 (Changed from 1000 default)
- Custom options: preset=faster,minrate=500,maxrate=500,bufsize=500,keyint=60 (Change appropiated settings to 500)
- Audio
- Codec: MP3
- Bitrate (kbps): 128
- We press on Continue button
- We check the input size to be 1024×768 as expected and press «Start recording». That’s ok. We are not actually going live yet.


So, now back to Youtube we can click into Basic Info tab and then again into the Live Control Room where we should see if our emission is right or not. If it’s right we can check a preview. You just have to click on Generate Preview button in Youtube. A youtube player will appear which will let you check how the streaming goes. Even if you record at 480p somehow the preview is 240p or 360p only.

So, that’s it.
If you ever want to go live once in the youtube preview page you have a button that says: Start streaming. So you just click on it and you are done.

By the way, you can click on «Cancel Recording» in Simplescreenrecorder if you want to go live later (some hours later). But, that needs to be done before going into Live Streaming (before clicking on Start streaming button on Youtube) else you will finish your event.
